President's Message
Fellow woodworkers,
This month is a mixed bag of bits and pieces – isn't that how we learn and improve - in incremental steps?
Finishing
Finishing is not my strength – the more I learn about varnishes the more I realize I don't know. Recently a fellow BAWA member pointed me to a resource I had never thought of using to learn about varnishes; Wikipedia. I use the site a lot for all sorts of technical and historic things – but for an explanation of varnishes? – you should check it out: Wikipedia
There are things I know and there are things I do, but they are not necessarily the same.
Our July speaker Rodger Heritzman was asked a question about what finish he uses. Part of his answer was that he usually buys a new can for each project because any finish left in the can from the last project will have gone off. Once opened and exposed to oxygen, finish has a limited shelf life. I know that but I do not use the information. The 'do not waste varnish' streak makes me think I can just get just one more project out of the can before throwing it away. Spend a lot of money on good wood and save a few dollars by finishing it with old varnish?
Just to make sure I got the message Ted Fay, our presenter in August, gave the same message. It is time to check my stock of opened varnish tins!
Just planks
I visited a shop on Post Street, San Francisco only a half a block from Union Square.
A more accurate description may be "art gallery" of which there a lot in the Union Square area. This one sells slabs of wood. Maple, Walnut, Madrone etc. All from salvaged big West Coast trees that for one reason or another have been cut down. The company, Urban Hardwoods, slices these trees into thick planks, sands, applies a finish and then sells them as tables, desks, etc. Usually they fit metal legs to make them into a piece of furniture but basically they are selling large live edged planks of wood. There is no traditional woodworking skill applied to the process and the planks are priced in the several thousands of dollars range. On their video below they say "Our woodworkers are mostly from art and design school"
We are in the world where, at one end of the spectrum, wooden furniture is made on CNC machines and any real wood is very thin veneer and, at the other end, wooden furniture is large solid planks of wood on metal legs. Not traditional woodwork as we know it.
See video: youtube
BAWA Show
The 2014 BAWA Woodworking Show at Woodcraft in San Carlos is fast approaching. I hope you are all planning to show some of your work. In previous years I have always been impressed by the range and quality of work on display. We have an amazing group of woodworkers in our organization. It is also good to see some of the work from students at high schools in the area who are still teaching classes in woodworking. Also fun is the Friday evening reception. One of the few times we get to meet socialy with our members and partners. Look forward to seeing you all there.
For details: Show info
Enjoy your woodworking
Frank (Contact at: Frankramsay8@aol.com)
President Frank Ramsay called the meeting to order at 7 PM.
New Members and Guests:
There were 2 guests present, Calvert who has about 5 years of woodworking experience and Greg Wagner, from Foster City who learned carpentry as a child and wants to learn fine woodworking..
Announcements:
Claude gave an update to the woodworking show, which will take place at the San Carlos Woodcraft store on October17-19, 2014. Advertising post cards and large posters were made available at the meeting for members to distribute in the community. The opening reception will take place on October 17th and we will be happy to accept any beverage donations. John Lavine and Andreas Strieve will again be the judges this year and will provide feedback on their impressions of the pieces exhibited at the November meeting. Members are encouraged to submit their pieces from the 2x4 challenge in 2013 as well as any new 2x4 projects they have done.
Per Madsen talked about the calendar. As mentioned, the November meeting will be feedback from the show judges. The December meeting will be the Holiday party with potluck desserts and hors d'ouevres. On September 18th Chris Weiss will talk about Japanese tool tuning. On September 27th Chris will hold a workshop on Tuning Japanese Tools which will include a ½ day seminar at his shop costing $40 and $100 for a Japanese tools to be tuned up. Details will be forthcoming from Jay Perrine and Chris.
Harold Patterson announced the next Toy Workshop to take place on August 30th at Jamie's shop. We will be making crickets and periscopes to donate to non-profit children's services organizations.
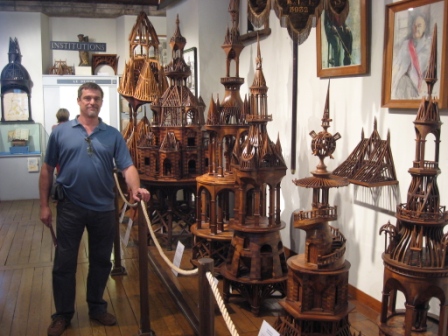
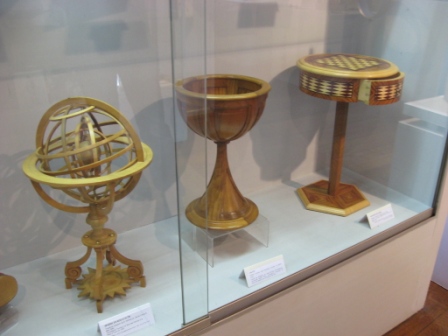
Claude then described a visit he made to the Musee d' Compagnage in Paris, France. This is a museum devoted to many types of craftsmanship-woodworking, leatherworking, iron working, baking, roofing, stonework etc covering the time frame of 1300 to the present. The museum exhibits works by apprentices in the various crafts to achieve master craftsman status after 7 years of apprenticeship to various masters. Claude showed many photos of impressive demonstrations of skill.
Ted Fay
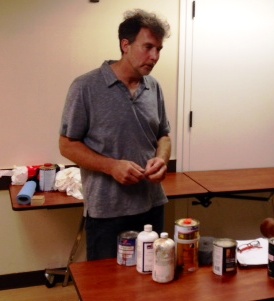
Per then introduced the featured speaker, Ted Fay, who spoke on his experiences in finishing techniques with special attention to finishes he has tried which he likes the best. He started out by cautioning that one needs to wear a good respirator and gloves to protect oneself from the materials, which can be toxic. He also stated that he does not use water based finishes very much so has no advice to offer there.
There are basically 2 types of finishes-those that harden by evaporation of a solvent such as shellac and lacquer and those that harden via polymerization, such as varnishes. The former types have the advantage that subsequent coats can heal defects in the coats below because the solvent partially re-dissolves the previous coat. The downside of this is that the finish is more delicate and subject to damage from water and alcohol. The latter finishes harden reversibly and must be sanded between coats so subsequent coats can adhere well. They must also be sanded or stripped to repair damage.
In his last lecture to us he described French polishing. Today he will talk about a bastard technique that gives a good result with less effort. The first finish he described in detail is a French floor finish called Rubio Monocoat. It is a 2 part finish that costs about $150 for an amount that will cover 500 square feet. It is a 2 component material, which can be brushed or wiped on. It does have a finite shelf life and its pot life is 1-1-1/2 hours. It gives a matte finish similar to Danish oil but is extremely hard and scratch resistant.
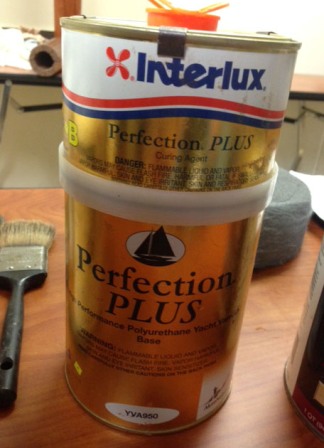
He then described a second finish, Interlox Perfection Plus, which is a 2-part boat conversion varnish and costs $100/qt. It is available from Jamestown Distributors and West Marine and is only available in glossy finish. To flatten it he recommends using Woolwax and 0000 steel wool, which he demonstrated later on in the evening. 3 coats of this material replace 8 coats of spar varnish. To strip this stuff you heed to use a heat gun. I has a 2-year shelf life and can be thinned up to 75% with 233N for use as a sealer. Following application it stays tacky for up to 6 hours but does not show dust. The resulting finish looks like a shiny bartop.
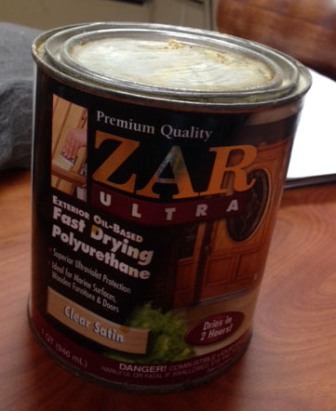
The third finish described was an oil based polyurethane varnish, Bona Woodline, which costs only $7/qt. It is a really hard floor finish. For less important projects he uses Zar Ultra Poly, which dries quickly and is inexpensive. To apply these materials to large surfaces such as the top of a bar, he uses a no lint plastic roller chased by a good quality 2-1/2 inch wide badger brush.
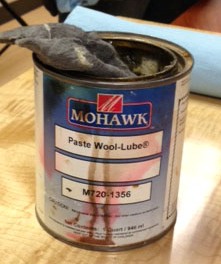
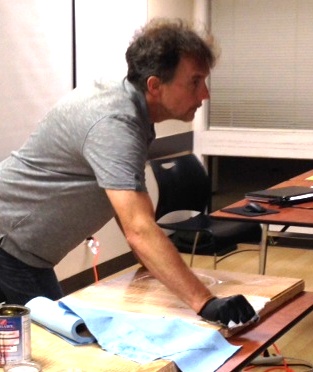
He then demonstrated how to use Woolwax, now called Mohawk Paste Wool Lube, which can be purchased at City Paint or Fregosi (now called SF Paint Supply). He wets the surface with water and glops on the Woolwax, forming an emulsified soapy film, and then rubs it in using Liberon 0000 steel wool, applying sufficient pressure to get fine scratches running in the same direction, using overlapping strokes.
He then demonstrated a method for quickly finishing a turned project on the lathe. He first applies Deft lacquer sanding sealer or shellac and then uses Mohawk RapidPad, which is a mixture of lacquer and shellac. It is applied with a cotton pad similar to that used in French polishing with a similar swooping on and off technique. The material dries in seconds so many coats can be applied in 10 minutes. To make the pad he uses Webril Handpads and wraps them in old soft cotton rags. The pad needs to be folded so it has no seams contacting the workpiece.
In response to a question he stated that before finishing he likes to sand to 400 grit for an oil finish, 220 grit for lacquer, 320 grit for French polish but only to 180 grit for maple as a rougher surface is needed on this wood for the coating to adhere.
Ken Napior — Antique Reproduction FurnitureDealing with Locks and Hinges
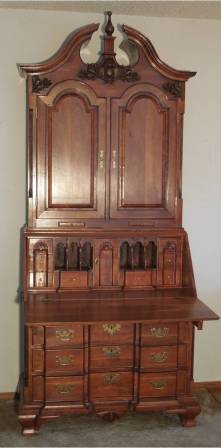
Ken Napior delivered a tech talk on Antique Reproduction Furniture dealing with locks and hinges. These items can add to the beauty of the piece if they are appropriate to the period and design and properly placed. They are typically made of brass and are either cast or stamped. Horton Brass, 800-754-9127, is a firm which makes only cast bras reproductions. Antique pulls are all copies. The pull should be located in the center of the drawer if the drawer is less than 14" wide. If the drawer is wider, 2 pulls should be used and should be placed 18-22" apart. When there are multiple drawers or doors on a piece, the pattern of the pulls on the piece should be carefully considered to give the most pleasing look.
Locks must be considered as part of the design of the piece from the beginning of the process as their placement and thickness of the boards on which they are installed are critical to the design process. Locks come in 3 types-surface mount, half mortise, and full mortise. When designing keep in mind that the keyhole, which should be placed in the center of the drawer or door, is often not in the center of the lock. The mortising of the locks can be easily done with a pattern bit on a router and a suitable template or with a saw and chisel. The key escutcheons can be surface mount or inlay.
Hinges must also be chosen as part of the design as well. There are Soss hinges, butt hinges, and knife hinges. Install them on the top and bottom of the rails. Always purchase a few extra ones to use as layout templates. They can be installed similarly to locks with either a router or chisel. Ken likes to install them using a Vix bit with a centering fixture to drill the holes. Ken holds the lock in place first with a steel screw and the installs the brass screws very carefully to avoid damaging them. He prefers Phillips head screws to slot screws, as they are more reliable to install even though they are not authentic to the period furniture. He recommends using scrap pieces of Formica as shims (they are 3/64" thick) in order to get the spacing of the door equal all around. Hardware vendors he recommends are Ball and Ball, Exton, PA, and Horton Brass.
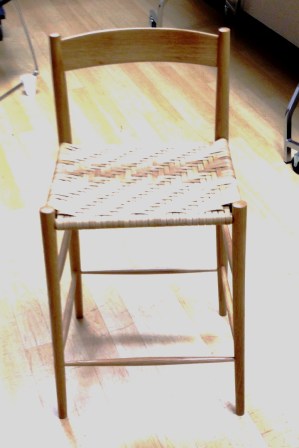
Jamie Buxton showed a ladder back chair he built and talked about their history in the U.S. They were commonly built on farms during the winter with simple tools-chisels, brace and bit, and a hand operated lathe using green wood. The latter was useful to allow bending to correct construction errors. Jamie's chair is more sophisticated. He used a special lathe to turn the spindles and steam bent the posts so that the back is raked at a more comfortable angle. He used modern glue to hold it all together and rattan instead of tree bark for the seat. The varnished white oak chair is quite light and flexes when you sit on it.
Tom Gaston showed a bowl he turned from camphor wood and a birch bark decoupage picture he made.
The meeting was adjourned at 9:30 PM
Stephen RosenblumNewsletter Editor steve@rosenblums.us
Pictures by Shura Monodru